
If you use voice memos for varying tasks like recording notes or music, then there may be too many voice memos on your iPhone. It may therefore become necessary to transfer voice memos from iPhone to computer for safe backup copy.
There are several ways to do that. Before we proceed, we can check the comparison table below to quickly choose the most suitable method.
| Support file type | Data Security | Transferring Speed | |
| Share Sheet | Single transfer | No data loss | Fast |
| Single transfer | No data loss | Slow | |
| iTunes | Bulk transfer | Data loss | Slow |
| FoneGeek | Single/Bulk transfer | No data loss | Fast |
| Airdrop | Single transfer | No data loss | Fast |
You can download voice memos from iPhone to other services by sharing them with other tools. For example, you can share the voice memo with mail to send the voice memo to yourself or someone else.
You can also share the voice memo to some services such as Dropbox, Google Drive, or Microsoft OneDrive installed on your phone.
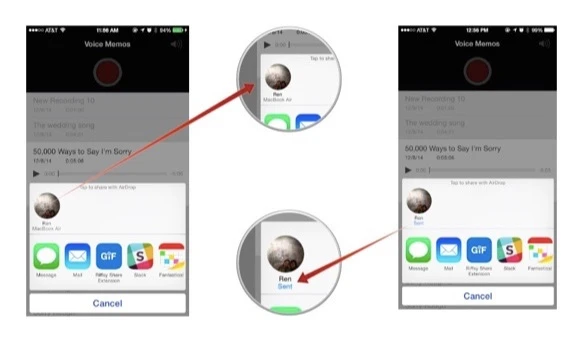
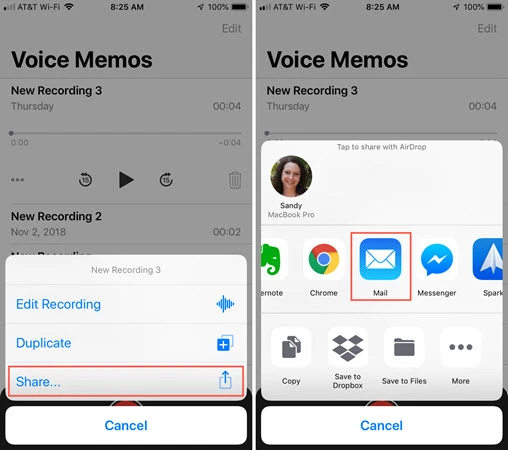
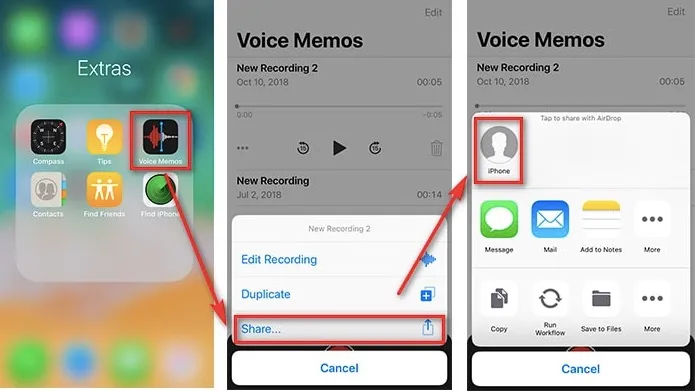
Step 1. Open the voice memo app, click on the voice memo you want to share, and then click the Share button to get started. This button looks like a box with an up arrow.
Step 2. Choose the service you want to share. For example, select Mail to email your voice memo to yourself. If you send the voice memo to your own email address, you can open your email and download voice memos from iPhone to your PC and Mac.
Step 3. Scroll to the right and click "More" to pick up other services. To use the service, its application must be installed on the phone. For example, if you need to use Dropbox, you must have a Dropbox app installed on your iPhone.
Repeat this process for each voice memo you want to share to transfer voice memos from iPhone to pc.
Warning:
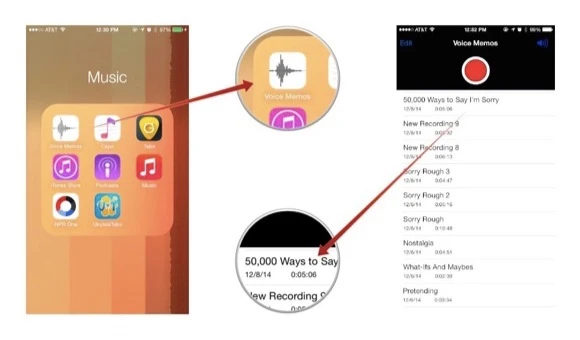
If you have relatively fewer voice memos on your iPhone, you might be able to get them on to your computer by emailing them to yourself. This method however only allows you to transfer one memo at a time, which is why it is not an ideal solution if you have too many voice memos to transfer. Here’s how to do it:
If you use voice memos frequently and want to move multiple voice memos at the same time, you can use iTunes to automatically sync new voice memos. You need to download and install the iTunes plugin to complete this task.
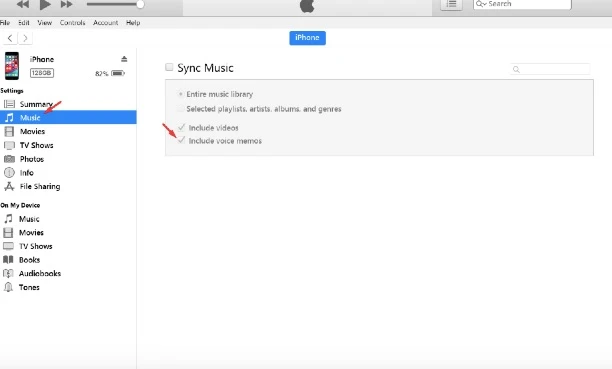
Step 1. Connect your iPhone to your PC or Mac using an USB cable.
Step 2. Locate your iPhone in the left pane of iTunes.
If you have not previously connected your iPhone to iTunes on this computer, you must unlock your iPhone and click on "Trust" to trust the computer. Follow the instructions in iTunes.
Step 3. Here are several options listed under your device. Click on ‘Music’ and additional options will be displayed on the right window.
Step 4. Mark “Include voice memos” checkbox in the right panel of window and click on Apple to sync the voice memos with iTunes.
Warning:
The methods discussed above will be useful to transfer voice memos from iPhone to computer. We have one more utility recommended here to you now. With FoneGeek iPhone Data Recovery, you have the opportunity to transfer not only voice memos, but also notes, contacts, text messages, iMessages, photos, videos, and 22 more data formats to your computer. Here are other features you can expect with this program:
FoneGeek iPhone Data Recovery: Transfer All iPhone Data to PC:
![]()
![]()
Step 1. After downloading the trial version of FoneGeek iPhone Data Recovery from its official site or by clicking the download button above. Start up this program and choose ‘Recover from iOS Device’ from the main interface.
Step 2. You have to connect your device to computer if you need to recover from your iPhone directly. A new windows will appear prompting you to select any data that you need to transfer. Mark ‘Voice Memos’ on the interface and the voice memos will be scanned by the program.
Step 3. The voice memo information will be displayed on the interface when the scanning is complete. Both the deleted and undeleted voice memos will be listed.
Step 4. Choose the voice memos you want to transfer and tap on the button of ‘Recover’ to transfer voice memos from iPhone to computer.
The program will notify you when the process is complete. Just keep the device connected to the computer until the transfer is done and all voice memos on your iPhone will now be available on the computer.
If you are using a Mac computer, you can easily use Airdrop to share voice memos between iOS devices.
All the methods mentioned in this article will be very simple for you to transfer voice memos from iPhone to computer. If you have the necessity to transfer more data rather than only voice memos to computer, FoneGeek iPhone Data Recovery program is available here. Almost all iOS data will be transferred from iOS devices to computer with this professional transferring program. Just download the tool on your computer and have a try.
Joan J. Mims is interested in researching all tips about iPhone, iPad and Android. He loves to share useful ideas with all users.
Your email address will not be published. Required fields are marked *


Copyright © 2025 FoneGeek Software Co., Ltd. All Rights Reserved


 English